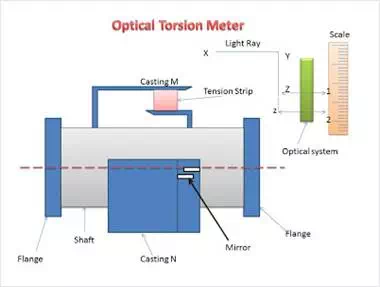
Due to torque, and angular twist (angular displacement) occurs on the shaft between its ends. This angle of twist is measured by using optical means where in angular deflection of light rays is proportional to twist and hence the torque.
Construction of optical torsion meter

The main parts of an optical torsion meter as follows:
A shaft is used on which two casting M and N are connected at a known distance.
A tension strip linking the two castings.
Two mirrors which are fitted and aligned on the castings.
A light beam falling on the mirrors, an optical system and a torque calibrated scale.
Operation of optical torsion meter
When the shaft is transmitting torque, a relative movement occurs between castings M and N, and due to this, the mirrors will change position ( partial inclination between the two mirrors) since they are attached to the castings.
As the mirrors are constantly made to reflect a light beam on the torque calibrated scale, due to the changed position of the mirrors, there will be an angular deflection of the light rays which is measured from the calibrated scale.
This angular deflection of the light rays is proportional to the twist on the shaft (relative movement of casting M and N) and hence the torque of the shaft.
Applications of optical torsion meter
It is used in steam turbines and I.C engines


Comments are closed.